How to move from hobby blog to profitable, successful blog.

Some of the tools, apps, and companies that I use for my personal organization or for NellieBellie...

Shoot Fly Shoot | When I realized how necessary taking good photo’s was to the success of my site, this is the photo class I took and loved. I recommend this to everyone and still watch the video’s occasionally for refreshers.
CoSchedule
 | I use CoSchedule to keep my editorial calendar organized, help me see what content I need to create for the week, and schedule some of my social media messages. It also allows me to keep my team organized easily.
Pomodoro Timer | On days that it is a struggle to stay on task, I employ this timer. Mine is set to 25-minute intervals. I find I can do anything for 25 minutes. And don’t mind telling others to wait that long for my attention.
Day Designer | This is my personal planner that I have used for a couple of years. I also highly recommend Planner Pads | because of their wonderful funnel system that keeps distracted people focused!
HostGator | Although I now use a much larger hosting company, I successfully used hostgator in the young years of NellieBellie and still recommend them for those starting blogs. They have good customer service and solid hosting.
StudioPress Themes for WordPress | These are the WordPress themes that I have used almost exclusively for all of my blog development ( for the many years I did that) and for NellieBellie. They are clean, well designed, and full options.
HostGator | This is the hosting company I used when I first started and still recommend for new and small blogs. 


Personally, having a minimal lifestyle and capsule wardrobe have dramatically increased the free-time that I have. It has allowed me more time for work AND play. Although not everyone can make the choices we have…our story may give you ideas for small changes you can make to help you on your dream.


How to move your hobby blog to a profitable, successful blog. These are the things YOU can control. Ways that you can make changes that will absolutely change your business!

Working on a business, rather than a blog.

Everyone has a blog. Your grandma probably has a blog. Heck, MY grandma probably has a blog. Having a blog isn’t anything special. But, what you DO with your blog can be. 

In my case, my blog was simply a way to show my talents and give me a platform from which to jump from. It allows me to create content for magazines, newspapers, e-books, developing cookbooks, speaking engagements, photography classes, and more. My blog is, in essence, a giant adjusting resume. It PROVES my expertise. Sure, I could keep adding and adding content to add to my expertise (and I do!), but for what? I need to DO something with gathered expertise. Expertise for the sake of expertise doesn’t further my future. Sure, more people coming to my site brings me additional ad income, that’s true. But ad income isn’t all it’s cracked up to be (ad income is becoming less and less a guaranteed source of income for websites) and certainly isn’t going to build me a long-lasting brand and career. I need more.

Waking up in the morning and treating NellieBellie as a business is what has allowed me to become successful in this creative space. I am a successful blogger, sure. But I am so much more. NellieBellie continues to morph and grow into other places then this single address on the internet. Places that produce even MORE opportunities to grow. Every opportunity brings a level of growth on a financial level, skill level, brand level, networking level, and more. Building a business is ultimately building NellieBellie into the future. 

Sure, there are those that don’t want to make money or a career at blogging. I get it. I have a couple of things to say to that…

  1. Don’t. Every person needs a hobby.
    And a hobby is, by definition, something you don’t NEED to do to meet your financial needs. No need to explain.
  2. Bloggers that make money are no longer bloggers.
    Do NOT for one second think that those bloggers you see making money with their blog are spending a few minutes banging out a post, sticking it up on the internet, and sitting back while the bucks roll in. These people are business-minded individuals with mad skills. They are skilled entrepreneurs that have used their internet address to push their message and brand. They are content creators, magazine authors, book authors, web design specialists, social media marketers, and a million other skill-sets that are marketable to the business world at large. They have worked like crazy for every. single. inch of their success. For real.
  3. I’m relieved.
    It is really, really hard to make a career at blogging. Especially in the year 2015. The internet is so heavily saturated with new GOOD blogs that want a little piece of the pie they have been eyeing. Sadly, they will never see a dime. I’m asked often to help someone start a blog to help them make money. I tell them…only if you don’t want to make any significant profit for at least 2 years. That is why I’m so thankful that you DON’T want to make money at blogging. It’s dang hard. Especially if you start now. And I don’t want hard for my friends.
Processed with VSCOcam with f2 preset
(my small office at move-in day)

Adopt business hours, business dress, and a business environment.

One of the biggest mistakes I made when I first realized the profitability of NellieBellie (remember, this was a couple of years ago…when blogs still had a chance at being something) was not creating honest to goodness work hours. And sticking to them. I kept telling people that one of the best parts of working as a blogger was the ability to stay in my pajamas and work from home. There are a couple problems with that statement, for me personally…

  1. At that point in the journey of NellieBellie  I was no longer just a “blogger” and should not have classified myself simply as that. Not that being a blogger is less than something else. But, it didn’t do justice to my work. I should have classified myself as a content creator. Or, at that time, website developer. Or even a social media strategist. But, I didn’t see any of those skills in myself at that time. Nevermind that I was building 5 websites a day…I didn’t see myself as a website developer. Nevermind that I was creating content FOR magazines and websites that never saw a moment on my site…I didn’t see myself as a content creator. I simply underestimated my value. And in so doing, allowed others to underestimate my value. Which didn’t allow me to grow as I should have. How can I become something I don’t believe I can?
  2. Thinking that “staying in my pajamas” was something to strive for. Do you know how bad it is for your psyche not to develop a good morning routine? To dress well. To put on your “face” and otherwise be the best version of yourself you can be? Again, I was setting myself to be underestimated completely. By myself and by others. I was the very thing keeping myself from being the best. I was my own worst enemy.
  3. Believing that “working from home” was the ultimate goal. I believed, at that time, that working from home was the ultimate in the measure of success. This came partly from my conservative upbringing and environmental culture that believed women working away from home was secondary to men doing so. Not intentionally, in any way. And I’m all for women staying home if they desire. In my case, I thought that working AND being at home was the ultimate in culture’s eyes. But I wasn’t truly working from home very well, it was utterly the worst thing for me. But, at that time, I knew what other’s view as success and didn’t realize it wasn’t my own measure of success. Now, I rent a small office space only minutes from home and physically go to work at least 3 days a week. GOING to work is something that I wasn’t raised to believe would ever be for me. Being able to do it feels amazing, successful, and SERIOUS.


janel-being-cute-resized
Get off the internet!

This is utterly the WORST time killer. The worst!! Being a business that lives almost entirely on the internet, social media, and email spaces you would think that staying connected to all of those places is vital.

Exactly the opposite! 

If you are a blogger that wants to create real, honest, genuine content you need to log-out and STAY logged-out for huge chunks of your productive hours. Otherwise, you are spending so much time distracted and connected to outside of your productive place that you don’t create content. Or if you do create content, it’s disjointed and less than it can be. You will waste away your opportunities online. Shut it down.

DO your business. LIVE your life. BE with people. From these places you will create your best and most authentic content. And your business will thrive.


Gift ideas | Creative Gift Ideas: 52 Unique Gift Sets for Under $20.00

Invest in your business.

Think of your blog as any brick and mortar business…it takes initial start-up investments. Sure, you can start a blog without a dollar invested but if you want it become successful you WILL have to invest some money and serious time. AND lots and lots of energy. Just like any start-up. Thinking that a successful blog doesn’t require that is utterly wrong.

Ask any successful blogger how much time and money they have spent to get where they are? How much did they spend before they turned a profit? They will all do this…

Laugh. Make a joke about how stupid they were and how patient their husbands were. And then tell you it was hours and hours (they really don’t know how many… it was so many) and hundreds if not thousands of dollars.

Just like a true start-up. 

Then. Then– when you DO get your successful blog up and running you have to CONTINUE to invest. You will have to pay to automate, hire help, maintain your site, pay for advertising, the list continues. Not doing those things isn’t an option if you want to simply maintain the level you are at. To grow? You got it…you have to spend MORE money, time, and energy.

Just like any brick and mortar business.

Do you get where I am going with this? A successful blog IS a business. Not “kind of like”. It IS absolutely and completely a business. With taxes and accounting and all.

Not treating it as such is a complete and utter mistake and recipe for failure. 100% guaranteed.

simple & joyful living

Take yourself seriously and force others to do the same.

I’ve touched on this in the other points but I need to stress, stress, stress the need to take yourself seriously. If you don’t see yourself as a business person full of skills that are valuable to the business world…start! The minute you take yourself and your brand seriously forcing those around you to do the same, things will move. 

Realize that your time is valuable. Force your family to recognize your business hours. Try to say no to friends that ask for favors during business hours. Turn off your phone, if necessary. These habits will take time to develop, especially if you don’t have any of these habits already developed. Just start. Get up in the morning and put on your power outfit, turn on some inspirational music, head to your desk (or office…if you can!), shut the door, shut off your phone and notifications, and work. 


Nellie being awesome, from nelliebellie.com


Moscow Unicorn (fruity Moscow Mule cocktail)

If you have never tried a Moscow Mule…it’s quite manly. When I say manly I mean…it packs a bit of a kick. That, I assume, is from the vodka. Or the ginger beer. So, our version mellows it out just a bit. Adding cranberry juice and a wee bit of sugar takes the manly away and makes it just…man?

I am so very happy it’s New Year’s Eve! That means the holidays are just about over.  Not that I don’t love them….I really do.  But after about a week of friends, family, parties, and my children being at home, I am ready to get back to the start of work.  Maybe that’s just because my job is fun.  But either way, too much vacation is enough to make a person insane. Or need a cocktail. A strong one.  Like a Moscow Mule cocktail. Well, truly…we are calling it a Moscow Unicorn because it has been girlified for my “dignified” tastes.

the Moscow Unicorn a girly moscow mule cocktail recipe.

 If you have never tried a Moscow Mule…it’s quite manly. When I say manly I mean…it packs a bit of a kick. That, I assume, is from the vodka. Or the ginger beer. So, my sister’s version mellows it out just a bit. Adding cranberry juice and a wee bit of sugar takes the manly away and makes it just…man? Um, okay, that’s strange. Either way, Moscow Mules are way more delicious when we take away the “mule” and insert “unicorn”.  You need to try this drink!  So simple and good. Just like our favorite cocktails should be.

We really love that the moscow mule uses only one type of alcohol, which makes the run to the liquor store much less expensive.  And the fact that it doesn’t need a shaker or any fancy cocktail tools is definitely a bonus!

This is a great drink to have for your New Year’s party because it is so easily adaptable.  It can be as strong or as weak as you like, and it can easily be made virgin for kids who might be at the party.  Just add this gentle drink in among your traditional, stronger cocktails and everyone will be excited to try it!

Maybe you aren’t into drinks with alcohol? That’s okay.  No judgement. If you love ginger, try my ginger tea…guaranteed love!  Or good old hot chocolate is always a winner!  And we have quite an extensive list of coffee drinks you can make without needing a fancy espresso machine or anything.

[amd-zlrecipe-recipe:43]


how to make your own cocktail umbrellas

Learn how to make a drink umbrella with this easy tutorial! Super easy and fun addition to your next party!

I have a dream. A dream of warmth, pretty cocktails, cabana boys, and lying about. In my dream, all of my cocktails –every single one- come with a cocktail umbrella. Probably a pink one. And delivered by a cabana boy whilst I lay in the warmth and chat with Nate. I don’t hear children in this dream. I don’t see dirty dishes or bills (nope, this dream is paid for) or grass that needs mowing.

Today I have an itty bitty part of my dream fulfilled…

Make your own cocktail umbrella's: so easy and fun to personalize!

how to make a paper cocktail umbrella. An easy to follow tutorial.


how to make a paper cocktail umbrella

how to make a paper cocktail umbrella

Supplies for cocktail umbrella:

  • paper
  • scissors
  • wooden skewers
  • hot glue
  • tinsel garland (optional)

To Do:

  1. Cut paper into circles about 3 inches in diameter (I used a mason jar as a guide)
  2. Cut a slit into the circle up to the center of the circle.
  3. Form the cocktail umbrella from the circle. Hot glue into place.
  4. (I cut my skewers in half but use the size you prefer!) Hot glue the umbrellas onto the skewers.
  5. For extra fun…cut up a bit of tinsel garland. Put a dab of hot glue on the top of your umbrella and dip it into the tinsel.

Now you too can have a dream worthy cocktail umbrella for your cocktail! Cheers!

DIY Drink Umbrella's are easy to make and fun to use!

 Now you know how to make your own drink umbrella’s! Make a stash for New Year’s or parties and keep them in a drawer. Drinks are always better with an umbrella…wouldn’t you agree? Why not check out our great cocktail collection and include pretty umbrella’s for the glasses? Fun!

Manhattan Recipe and Old-Fashioned Recipe

How to make a Manhattan | a basic Manhattan recipe

Manhattan’s and Old-Fashioned’s are masculine and strong cocktails that should be in everyone’s cocktail making repetoire.   Don’t get freaked out, these are quite simple to make and can take as delicious, if not MORE delicious, than your favorite bar’s version. 

After a long hard week, I love to unwind by making myself a gorgeous cocktail, sitting by the fire, and listening to a book for a few minutes. An old-fashioned is one of my personal favorites because it reminds me of days gone by, black & white films, and old-school actresses. 

You can find bitters at your local liquor store.  If you don’t know where to look, just ask the clerk!

Tips and Tricks:

  • Sugar cubes and water can be substituted for simple syrup in these drinks.  
  • Rub your rims with orange peel.  This gives a little added flavor and complexity to the cocktail.
  • Don’t stir these drinks too much, or fill them with ice!  You’ll water down the drink and “cloud” it.  Just stir a bit and put in enough ice to cool the drink. Better yet, try flavored ice cubes or frozen fruit.

[yumprint-recipe id=’96’] Manhattan Recipe Variations:

  • Bourbon Manhattan Recipe:  Substitute bourbon for the rye whiskey.
  • Black Manhattan Recipe:  Substitute amaro for the sweet vermouth.

[yumprint-recipe id=’97’] Old-fashioned Recipe variations:

  • Old-fashioned sweet:  This variation adds cherry juice to the mix.  Use the same amount of cherry juice as bourbon.
  • Maple old-fashioned:  Take out the sugar and water and substitute it for a tablespoon of maple syrup. One of my favorite drinks at a local bar uses a maple-infused bourbon…yum!
  • Mint Julep:  This is a very popular bourbon drink that is similar to an old-fashioned.  Skip the bitters, and instead muddle several mint leaves in the bottom of the glass with your sugar and water.  This drink is best with TONS of ice.  (Muddling is basically just crushing everything together to extract the juices.  Keep the leaves in the glass when you serve it.)

Don’t forget to check out our absolutely most popular cocktails… Sex on a Snowbank and the Lemon Drop. I think you’ll love serving these up at your next dinner.

microwave brownies in a mug.

This is a quick and easy dessert that serves just one. Perfect for when you are looking for a sweet midnight snack or your kids want an after-school treat. You can make up a microwave brownie-in-a-mug in about three minutes with ingredients you already have in your pantry…

microwave mug brownie ingredients

And you can mix up the whole brownie recipe IN the mug (no extra dishes…score!) with a few quick and easy steps…

microwave mug brownies

Seriously, this brownie was about 3 minutes. Including the cooking! Kinda like a glorified Easy Bake recipe…don’t you think? Please tell me I’m not the only one old enough to remember those guys. With their dangerous exposed light-bulbs, super expensive mixes, and little girls begging their parents for one?

Walah… a tasty, chocolatey, gooey brownie! All made up during the next commercial!

Microwave 3 minute brownies in a mug are easy and fast! Perfect treat for one person.

[yumprint-recipe id=’261′] 

If you are looking for fast, easy, and simple recipes like this you shouldn’t miss our Lazy Baker ENTIRE CATEGORY full of short-cut recipes. Like pull-apart breads, petit fours, and even Grandma’s fudge. These recipes are meant for those that are a bit gun-shy in the kitchen and still gaining confidence in their cooking skills. We hear ya. No need to fuss and stress…use our cheater recipes to look like a kitchen super star!

no-sew DIY fringe clutch


This fringe clutch is no-sew, easy to make, and a great way to update or refresh dated bags and clutches. You will use this idea for many other pieces in your closet!
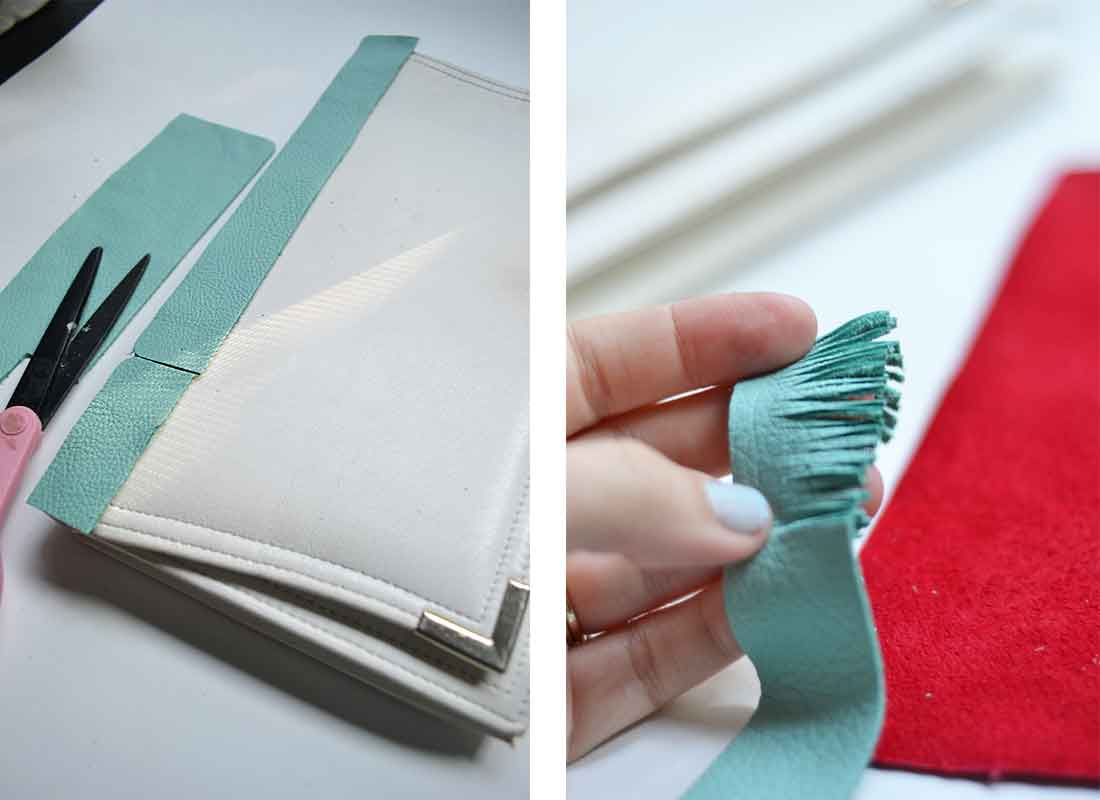
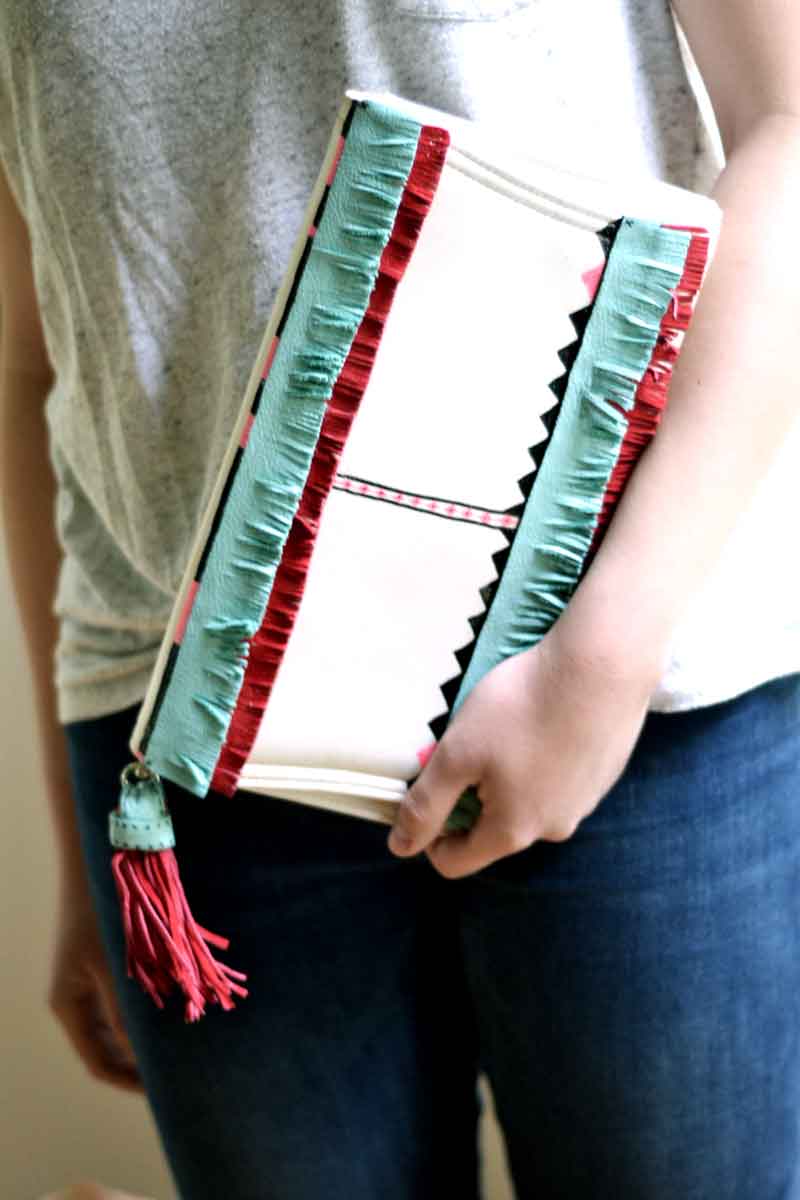
Plain clutches are quite easy to find at thrift stores and are very inexpensive probably because they are dull and sad clutches, eh. But when we finish them they are original and beautiful pieces that you will be complimented on again and again (believe me, I  get complimented all the time!). Why purchase something new when you can give life to something old? Save the planet and maybe revamp something you already have in your closet! So, I want to clarify that we aren’t making the clutch itself but rather revamping it into something new and fresh.

You only need a few, easy to find materials from your craft store to update a dated clutch into a trendy fringe bag.

The clutch I used for this is a basic white clutch that I found at the local vintage shop in a bin FULL of clutches and wallets. The suede is from a large craft store, as well as the E6000. Feel free to use leather if you like, but DO NOT skip using the strong adhesive. Any super strong adhesive similar to E6000 will do but is absolutely essential to making this bag something you can use daily. I am not about creating pretty things that can’t be used. This is meant to be pretty AND practical!

Simple steps to create a no-sew fringe clutch.

Gathering the supplies truly is the hardest part of this whole project. Putting the pieces together is a bit time-consuming but not hard, at all. Simply decide how long and how wide you want your fringe to be and cut your material accordingly. Because the material can often be a bit expensive, take your time figuring out what you want to do. Measure twice, cut once as my Grandma always said. 

My grandma would be pleased with this project. She always had bags of leftover fabrics and bits and bobs for us to make things with when we visited her. We never came up with anything as sophisticated as this clutch but we still had fun glueing bits to paper. Our favorite…making doodled people with fabric clothes and hair. 

Remember that you will need a wee bit of fabric at the very top of the fringe that is NOT cut and is used to glue your fringe on to your bag. Do NOT cut that part.

After you have measured your fabric and decided if you want your fringe to go all the way across your bag, or across the sides, or hey… you want little bits of fringe all over it is time to cut tiny little strips into the bottom of the fabric. This creates the fringe. And yes, it is a bit time-consuming. Grab Netflix and settle in for a bit. It’s not difficult, just takes a while.

Lately, I’ve been watching Game of Thrones and am admittedly a bit addicted. Remember back to the world without Netflix or DVR or on-demand movies? Sigh. I miss that time. Although, then I wouldn’t be able to watch Game of Thrones whenever I feel like. So, there’s that.

Steps to take to create a no-sew fringe clutch

After you have created your strip of fringe you simply use that strong adhesive to carefully glue it in place. And repeat the process as many times as you wish, in as many colors as you wish, for as many bags as you wish. 

If you have to piece two pieces of material together to make one pieces be sure to glue the seams well so they don’t catch and pull apart.

How to create a diy fringe bag

I haven’t given you step by step directions for creating my specific bag because I don’t want you to. I want you to make one that YOU have designed. I will, however, tell you that my bag uses Sharpie fabric pens to create that graphic design. And I created a tassel by wrapping a strip of fabric around a giant bundle of strips of fabric. But there is a great tutorial for making tassle’s on Tatertots and Jello that would be great! You can find that HERE.

Some ideas for creating your own design:

  • covering the entire front of the bag in fringe
  • running fringe along only the side and hanging suuuper long fringe from the corners
  • adding a strip of extra long fringe only at the bottom of the bag
  • using all one color fringe EXCEPT one single strip of a different color-cool!
  • making shapes into fringe
  • trying different fabrics (what about denim?)
  • bedazzling the fringe!
  • using long fringe and then adding beads to the end of it (simply knot them on)

Have you re-vamped something in your closet and made it new? I’d love to hear about it. Tell me about that skirt you dolled up, or the sweater you made sweet elbow patches for. Or… maybe you took this tutorial and freshened up a bag you had laying around being sad. Whatever it is, I’d love to hear how you gave something old new life!

Gingerbread cookies with eggnog icing

egg-nog-frosting

Is there anything that reminds you of the holiday’s more than the spicy flavor of gingerbread or the smooth creaminess of eggnog? Those two flavors make you want to grab a family member and sing carol around the Christmas tree… don’t they? 

Well, at least in my house.

Although, off topic…have you ever made or had homemade eggnog? Yeah. I just can’t. Google how it’s made and then come back to me and let me know what you think. I want to talk about all tasty cookies and not get you weirded out. 

gingerbread-cookie-recipe

Umm, yeah. About those cookies :). I make a classic gingerbread cookie that always makes my Christmas cookie making list. Always.

You CANNOT say you are a Christmas cookie maker and not make gingerbread. Sorry, folks…it’s the truth.

My gingerbread cookies are crispy, spicy, warm, and sweet. At the very same time. I use THIS gingerbread cookie recipe.

Gingerbread cookies with easy, smooth, and fast eggnog icing.

But then…

But then I go one step better. And put eggnog on top of the gingerbread cookies. Smooth, creamy eggnog. In frosting form. I KNOW!!! Don’t you just die. 

It’s easy, really. I can hear you thinking there are too many steps or it’s too complex for you because you aren’t a food blogger and spend all your time in the kitchen like me. 

First, I have teenagers, a business, a husband, NINE brothers and sisters, FIVE bro and sisters-in-law, a dog, and live in MN where we shovel 452 days of the year. I don’t have time for silly stuff either.

This eggnog icing is fast and easy. And tastes like heaven. No silly stuff, I promise!

gingerbread-cookies

Okay, so the addition of little pearls on the star edges might have been overkill. But, I was watching Games of Thrones and needed a reason to “work while I watch”. Putting little pearls on one by one takes time! I got an entire episode in while I did them :). Sometimes you gotta be clever. And, let’s be serious…the pearls make the cookies prettier. Which makes you click over to see the recipe. Which makes you hear about this yummy frosting. And the frosting makes your life better while still being simple. Which makes me good at my job.

Yay pearls!

So YOU can skip the little pearls. But DON’T skip the frosting. Please. Try it!

[yumprint-recipe id=’263′]

cottonball Christmas wreath

This cottonball Christmas wreath is a project created over a year ago and lost in the drafts, never to be posted. I wanted to post it because of it’s simplicity, low cost, and brightness that many of you will appreciate. Cottonballs turned into a Christmas wreath deserves a bit of love, wouldn’t you agree! (just nod your head :))

White Christmas Wreath | This snowball wreath is easy to make and is a fun, bright twist on traditional decorations.

Because our housing is much smaller than in years past, I’ve been trying to create decorations with a very small budget and the ability to dispose of them afterwards. We decorated our tree with candy this year, used pinecones as garland, and cardboard and glitter for ornaments. This white Christmas wreath is made with cotton balls and dollar ornaments. Truly. It doesn’t get much cheaper than that!

I also love how bright and colorful this wreath is.  Our apartment is bright and light and airy, so traditional Christmas decorations can look out of place.  Light, bright, white, and colorful Christmas decor is much more fitting for our cute little place!

cottonball wreath materials

White Christmas Wreath Materials

  • cotton balls (1 bag will do a 12 inch wreath)
  • mini ornaments (these are from the dollar spot at Target)
  • wreath form (make your own from cardboard!)
  • hot glue and gun.

cottonball wreath step2

To Make Your White Christmas Wreath:

1- Pull your cotton balls apart just a bit and apply a single layer of cotton balls on your form. Pack this layer in nice and tightly.

cottonball wreath step3

2- Now, add depth to your wreath by hot-gluing additional cotton balls on another layer. Fill in holes, cover sides, make that wreath look awesome!

cottonball wreath step4

3-Use hot glue to glue the mini ornaments onto the wreath. Be sure to watch where you place them so that they will be nice and sturdy. Tucking them in a bit is usually a good idea.

Wrap a large ribbon around your wreath and hang it on your wall. You did a great job!! Look at your beautiful wreath that didn’t cost you your entire week’s worth of lunch money! You can see ours is hanging on our Advent Wall along with our zip-tie garland.

advent wall


Cranberry Rosemary Orange Scones

These Cranberry-Rosemary-Orange scones are sweet, tangy, and delicious!! The orange glaze is just the icing on the top (get it — Icing on the top! :))Be sure to get this recipe!


Cranberry Rosemary scones with orange glaze

Is there anyone in the world that doesn’t have a love affair with scones? I doubt it. Scones are sweet and buttery and light and flaky all at the same time. Add to that their ability to meld all sorts of flavors into themselves and you have a breakfast pastry that can’t be topped for its versatility, flavor, and simplicity. 

My favorite recipe uses a combo of cranberries and rosemary…a classic flavor duo…but with an added touch of orange. The orange keeps the scones light, fresh, and fun. And the orange glaze drizzled on TOP of the scones? Oh. My. Gosh. It’s bright and packed full of flavor. You’ll be licking off the tops of your scones.

cranberry rosemary scone with orange glaze

Wherever possible, when using orange and rosemary…use fresh. It’s tempting to pull out dried herbs and zest for baking, but the flavor you get from the fresh ingredients really is the best. The extra two minutes of chopping rosemary and zesting a lemon will be worth it.

Note:

Did you know that smelling citrus boosts your feel-good hormone in your brain? True story. 


orange-cranberry-scone

It’s important to use cold butter when making scones so that you can achieve that beautiful buttery and flaky pastry.

Why cold butter?

When the butter melts in your dough while baking in the oven it creates little pockets where steam expands and helps the dough rise. If you have butter that is melty before you get to the dough to the oven, you lose those pockets of gas expanding, leaving you with a denser, less fluffy scone.

Tip: 

Freeze your scone dough for an hour or so before baking to get the ultimate in light and flaky scones!

cranberry-rosemary-scones

Don’t get crazy with forming and rolling your scone dough. The less you handle it, the better. Simply pat it into a circle about 9 inches in diameter, as evenly thick as you can get it, and slice it into eight pie wedges. Then bake. 

cranberry-orange-scones

Sure, those scones will come out of the oven ready to be shoved into your mouth. Frankly, you might not make it to the glazing step before you find yourself minus scones. I would highly recommend baking these up when your family isn’t home. And if they are home, DON’T turn your back. 

Off topic…

Have you played the Super Mario board that has the little ghosts that will attack you if you turn your back to them for too long? As long as you are looking at them they stay where they are but the minute you turn your back… BAM! My family is little ghosts when I’m baking in the kitchen. DON’T TURN YOUR BACK!

Anyways, you can feel free to use purchased orange juice for the glaze but since you already of the fresh orange to grab zest from why not use fresh orange juice? It really will make a huge difference! 

You think that I’m crazy with the vodka addition to the glaze, don’t you? Try it sometimes and you’ll be a believer. Vodka adds a wonderful kick to the glaze that cuts a bit of the sweetness from the scones out, in the best possible way. 

Plus, everything is better with alcohol. It’s truth.

ingredients.

For scones:
3 cups flour
1/3 cup sugar
2 1/2 tsp baking powder
1 tsp salt
1/2 tsp baking soda
2 tab grated orange peel
1 tsp rosemary (just used dried, it’s easier)
3/4 cup chilled butter, cut into pieces
3/4 cup dried cranberries
1 cup cold buttermilk (for a quick substitution, see below)

For glaze:
1 cup powdered sugar
1/3 cup orange juice
1 tab vanilla
2 tab vodka (optional)

directions.

For scones:

  1. Preheat oven to 400 degrees. Line a cookie sheet with parchment paper.
  2. Put flour, sugar, baking powder, salt, baking soda, orange peel, and rosemary into large bowl.
  3. Add butter and mix into flour mixture…gotta use your fingers! You want it to look like crumbs.
  4. Mix in cranberries.
  5. Gradually add buttermilk, use fork to stir until it gets mostly mixed together (it will still have clumps!).
  6. Put the dough onto a floured counter and knead a few times so it sticks together. About 4-6 times.
  7. Form the dough into a circle about 9 inches in diameter. Cut into 8 wedges. (if you have time pop the wedges into the freezer for about an hour)
  8. Put the wedges onto the baking sheet about 2 inches apart.
  9. Bake until golden brown, about 25 minutes. Let cool about 10 minutes.

For glaze: 

  1. Mix all ingredients together.
    If necessary, to achieve needed thickness add more powdered sugar.
    Drizzle the glaze on top of the cooled scones.

To make buttermilk :

Put 1 tablespoon lemon juice into 1 cup milk.
Let sit for about 5 minutes.
Wa la! Buttermilk.


How to make a ring dish at home.

This diy ring dish is so quick and easy to make, so adorable to have, and so incredible awesome to give!. All in all…you NEED this in your life in some fashion. And after you see how to make it you will be wondering why on earth you haven’t made one for your grandma or aunt before.

This DIY ring dish is so quick and easy to make, so adorable to have, and so incredibly awesome to give!. All in all…you NEED this in your life in some fashion. And after you see how to make it you will be wondering why on earth you haven’t made one for your grandma or aunt before. This Christmas will be the year of awesome gift giving! 

A diy ring dish that is so quick and easy to make with a thrift store dish and knick-knack. This would make a great gift!

The CUTEST little ring dish you ever did see…right!! And it’s so easy. Here are the materials you need…

materials needed to make your own diy ring dish

Materials:

  • super glue
  • paint (spray paint keeps this easy!)
  • knickknack
  • dish

Let’s talk about these materials for a bit. There is no right or wrong to what you choose. You want to find a knickknack that fits nicely with the dish and stands up a bit. It can be a cow, a bell, a tree…or a man :). As long as it’s fairly skinny, and not too wide that it covers your dish. If you can find a deer with antlers…how cool would that be (rings could go on the antlers!)! And, if your figurines don’t match that doesn’t matter …because you will be painting it anyways!

diy ring dish step2

Glueing is just that…glueing. Nothing fancy about this. I would recommend that you just watch that you don’t glob so much glue on that it seeps out from under the figurine and creates a yucky edge. Hold it firmly for a minute or so and then let dry.

diy ring dish step3

After your dish is dry…take the paint to it!! More coats with less coverage are better than heavy coverage with fewer coats. Truly! Let dry in between coats!

The gold paint I used is awesome because it dries very quickly in between coats (remember, thinner coats!) allowing me to reapply quickly after!

Tip:

Use a large box to paint your dish. Set a fan nearby to keep the fumes from being crazy bad. Or, if it’s nice outside where you are…take it outside.

diy jewelry dish

That’s truly it! It is so easy to make this sweet dish.

I think this is a wonderful gift idea! You can customize it however you like, exactly the way you know the recipient would like it! DIY ring dish= happy Christmas gift giving!